Friday, December 11, 2015

What the F-Stop!!! Part I: Aperture

I am finally diving into one of the more complicated parts of photography the F-STOP!!! My whole goal is not to over complicate the situation and to get you up and running ASAP.  Remember I am REALLY SIMPLIFYING THINGS.

So lets start with math, in specific, fractions!


The only thing we need to do is to learn how to multiply and divide a fraction by 2.

Here's my waffle:
I am going to share it so I cut it into two peices:


I have two halves of my waffle and I want to divide them by 2. If I did I  would end up with 4 pieces or fourth pieces (1/4) of my waffle (1 half of my half) . This is great because now I can share it with 4 people!


 1/2 divided by 2 = 1/4

Since dividing fractions is just like multiplying to make it a little simpler. If I need a half of my 1/4 I would end up with 1/8 of a pieces.


Quick cheat: Multiply denominator by two


If I were to continue it would go as follows:

1/16, 32, 64, 128 ,256.

Now the opposite: If I wanted to increase my pieces by 2 then I would multiply.


So if I had an 1/8 x 2 = 2/8 or 1/4


If I then decided to do it again my 1/4 x 2= 2/4 or 1/2 (right back to the beginning)

Quick cheat: divide the dominator by two.

The same would happen if we were multiplying and dividing by 3's. Heres a quick example but all we are concerned about to day is 2's !

What if I were to decrease by 3 then: 1/2 / 3 = 1/6
What if I were to  increase by 3 then: 1/6 x 3 = 1/2

THATS IT WITH THE MATH LETS MOVE ON TO PHOTOGRAPHY!!!

If you have ever been around photographers or watched a you tube video they always talk about adjusting by "stops" or how lenses offers you "stops" (image stabilization and aperture) . When I first was interested in photography I would talk to a guy, and he would be bombarded with his "stops" talk. I understood  .01% of what he was talking about most of the time we talked . However, I still listened because I knew one day I would understand.

"STOPS" EXPLAINED(only full stops):

Just understand this, if you go up or down by 2 you are moving 1 Full Stop. That's it! Up and down changes in respect to what we are talking about but I'll explain in future post!


If you must know the technical side of things CLICK HERE!!


Here is a list of how full stops relates to different camera settings(aperture, shutter speed, and ISO)


Aperture (Lens) 

1.4 - 2.8 - 5.6 - 11- 22
1 - 2 - 4- 8- 16

Normally seen: 1 - 1.4 - 2 - 2.8 - 4 - 5.6 - 8 - 11 - 16 - 22 


Shutter speed (Camera Shutter) 

1/2 - 1/4 - 1/8 - 1/16 - 1/32 - 1/64 (<---look familiar)

ISO (Sensor/Film) 

3200 - 1600 - 800 - 400 - 200- 100 - 50

The numbers listed above are from brightest to darkest setting. We will go into this later.  But enough with the talking lets test it out.
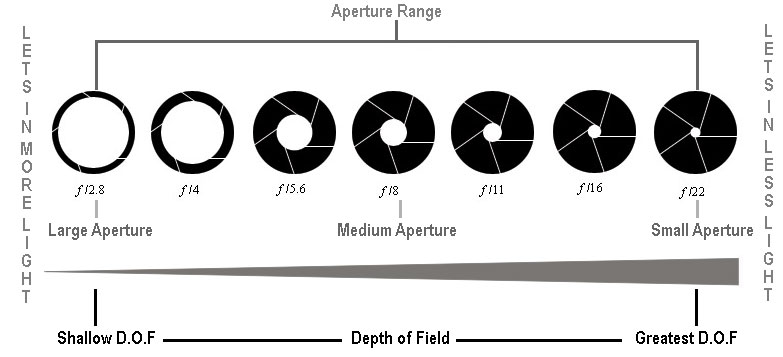
Aperture 

We will just be working on Aperture. Aperture is determined by your lens. Normal kit lenses come with an max aperture setting of f5.6 or lower.  Lower?  In the camera world the bigger aperture number is the lower and slower the lens is.  They are usually not good for low light settings. If you look at the professional series for your camera lenses,  they start at f/4 and go to f/1.2.  The are also called "faster " because they allow more light into the camera which uses a faster shutter speed. These lenses are great in low light situations, but have two draw backs. Do you know what they are?  Below is the difference between f/2.8 and f/1.8.
Picture can be found here

TERMS TO LEARN (Aperture) 

-Stop down: from high to low aperture or large(f2.8) to small (f5.6)
-Stop up: Just the opposite

PRACTICE FOR THE WEEK

For the next week or so play around with this setting, and tell me what you find out!

The Setup:


1) Put your camera in AV mode aka aperture priority! (LEAVE IT THERE FOR THE WEEK)
2) Set your ISO to AUTO ( for now)
3) Start shooting. Go outside, inside, shoot at night, or anything else that tickles your fancy.
4) Be sure to say out loud what you are doing. if you are are f5.6 and go to f/11 say out loud, "I'm going up a full stop of light"
5) Repeat this to yourself and write it down so you under stand whats happening

Questions to ask yourself?


What is happening to my background as I change stops?
What is happening to the foreground?
How does you camera sound when you take a shot?  Slow or Fast?
How has my ISO or Shutter speed changed when I take each shot?
Are any pictures blurry or grainy?

Here are all my practice shots below:


f/1.4


f/2.8


f/5.6


f/11


MY PEFERED WAY TO BUY PHOTO GEAR ( Part II: Craiglsit)

CRAIGSLIST

I saved this post for last because this is my favorite way to get great deals! If you take your time, and use some of my strategies (they aren't profound) you can get stuff for a lot cheaper. I am not responsible for any harm or danger that is cause by my opinion and use everything at your discretion! 

Lets get started:


1- Find a deal within you price range. 


I usually try to search something that is roughly 20% above your price range. So, Im looking to spend about $200 on a 50mm f/1.4.  20% above my price range would be  $240-$250 So my options are Logan or Chicago, if I want to stay within my range. 

I also look at those to good to be true post as well. Sometimes you might get a great deal. ALWAYS STAY AWAY from those "email me at :  B R E N D A 4  &  @ G M A I L . C O M"   They are usually a scam and waste of time. 


2: Examine


I generally just try to look at the pictures. Since the Chicago post had none, I went with the Logan Square option. 
His/Her picture looks great and equipment looks clean. The next step would be to contact them and set up a meeting.

3: Setting Up the Meeting (most important) 

This is where the savings actually start.  Never name you actual price. Heck don't say a price at all. Tell the seller you want to see the product in person, you will be bringing cash., And express how motivated you are to buy the item asap.  If they ask price, and  pushing you  to name price, tell them you can't without seeing the item. (Also, this is a sign of how they might be in public) 

If you do all the negotiating before you see the item its harder to get a lower price once in person. The other option is you name this low price and they instantly accept. Ex: On an 270 item, you offer 200, they instantly say yes. Who says you couldn't have offered $180 and they'd have accepted!!! 

So leave the money out of the equation until necessary. 

Always pick somewhere safe with a lot of people. A restaurant, police station, or library for example. Never do a deal in a parking lot or at someone's house! Always try to do deals in the daytime. This way you can see who you are interacting with
Lets not forget to be honest, courteous, and on time! 

4: The meeting

On the day/time of the meeting take the amount of cash you want to spend. I personally take $20 dollar bills (you'll see why later). Leave all other forms of money/payment in the car or home.  After the introductions,  make sure you throughly examine what you are buying. I like to use the list that is provided here for all my camera purchases.  Its also useful for when you are trying to buy your own camera gear.  EXAMINE, EXAMINE, EXAMINE!!! Make sure everything seem right and if it doesn't walk! At this point you don't even have to bring up money. You can walk away with no harm or foul. 

5: Your Offer

If you've made it this far you like the product and you are ready to buy. This where I uses a little visual stimulation.


                     VS
I don't know what it is, but $200 worth of 20's alway gets a buyer better than 2, $100 bills.  You probably think I am crazy, but try it out!  Depending on condition I go in low.  My offer would be  $180, Why because it NEVER hurts to ask!!I f its a "no",  would go to $200 (my max). If they aren't having it reiterate to them its all you have (the truth) and show it to them ( he selling point). I take it a step further and count it in front of them. 

At that point most people cave in. Give them time to look at the money and think about it. It starts to look like this....


If the answers "no", go to the restroom (hide the money in a new pocket/shoe) then exit safely. I promise you that there will be a better deal  If its a L series lens for 50% off then BUY IT!!!!

6: Enjoy your new lens!!!

Nothing better than getting something new and saving a lot of money!!!! In the process you might meet someone is a great photographer and make a new friend!!! 


7: Other Info

They are other tips and tricks that I use to help me get the best deal. This is just the one that that anyone can use to save on Craigslist. One day I'll reveal all of my secrets!

As a warning I always advice against seeing a stranger in public. I alway let someone know I am going out, where the meeting is, time of meeting, length of time I expect to take, when I arrive, and when I leave. I know I take a lot of precautions but I only have one life to live! If you can always take someone with you! Setup a call during the meeting to make sure you are okay. Heck have a code word you must say! 

I am not responsible for any harm or danger that is cause by my opinion and use everything at your discretion! 

Thank you for reading

Comment below and tell us about your great finds/deals!!!!

Saturday, November 28, 2015

MY PEFERED WAY TO BUY PHOTO GEAR

If you have had the opportunity to read my first post you know my personal collection consist of canon gear. If you did a rough total of what I own it  should come up to about $5000.  I must let you know that I didn't pay that for my gear. This post will show you how to get the most out of what you have now and save when you plan to upgrade.

1. Be Content!

So you are decided you want to be a pro photographer! Your friends and family like your photos and heck you do too! However, you feel like the one thing that will set you apart from the "tourist" photographers (the ones with the Canon and Nikon neck straps), is new pro gear! Well I am sad to announce that is wrong!

The gear you have now is the cheapest gear that you can own. Why? You already own it! I believe that you should push the gear you have now to its limits.  Learn everything you can about it. Learn the menus and functions of each button. The best part of all of this is that the knowledge learned can  used with your upgrade camera, if you decide to stay within the same family.

Once you are ready to upgrade do it because you have reached the limits of your current setup.

Couple of reasons why I upgraded:
- Wanted full frame to take full advantage of my lenses.
- Wanted better white balance
- Faster shutter speed
- Better ISO range


2. Buy Used!

I would strongly suggest buy used gear and equipment. The reason for this is that there are tons of savings to be had buying used. Don't get me wrong for some buying used is not for them. However, you can get great used deals.

As I did a quick price comparison on B & H Photo for a 7D Mark II. A new one came to the price of about $1900 while a used is about $1100 (taxes not included). The money saved can be used for buying quality lenses or other great gear.

A better example is my personal experience. I was ready to go full frame camera, and I was in toss up between a 6D and a 5D. I did a lot of research and read tons of reviews. Everything in me pointed to the 5D Mark III.  I got in my car and drove over to Procam in Aurora, IL. I went in the store talked everything through and it came down to $1400 or  $2200 before taxes (Canon was running a special at the time). My skill level at the time couldn't justify paying $2200 for a professional camera, so 6D won the battle.

After about 6 months later I ended one of my favorite sites (read below) and found a 5D Mark III with battery grip. I ended up selling the 6D and buying the 5D Mark III with a Canon battery grip. The best part is that I ended up profiting from it. The 5D was purchased for the sale price of the 6D (~$1200). How did I profit? Currently, a used 5D mark III is still selling for $2200 on BH without the grip. If I sold everything today I can expect to make $800 -$1000 profit on it.  Do yourself a favor and BUY USED if you can!!!

3.  Where/How I Buy

If you talk to my wife she knows I spend a lot of time on eBay, Amazon, and Craigslist (my favorite place). My suggestion would be to do the same when it comes time to upgrade/purchase your gear. There are so much more savings to be had on these sites than they put on.


eBay & Amazon

If you know anything about Amazon and eBay, sellers get charged a fee (roughly 10%) on their sales price. Also, these sites dictate shipping cost as well as takes a percent from that shipping cost too. Sellers take a hit on these sites selling items. This is where you swoop in, and get a discount.

Here's my play by play:
1. I search for items over priced or ending soon with no bids.
2. I contact those sellers and offer them a great deal. The goal is more profit than they would get through ebay, but I price it less than their offer. (Always make sure you can pay at that instant)
3. Find a secure way to send money. (NEVER DO MONEYORDER OR WIRE TRANSFER). I personally stick with Paypal.
4. Make sure all terms and conditions are met before you send/give anyone a dime.
5. Pay and enjoy your item. If a review can be given, give the best review EVER!!!

So far I have had no issues purchasing items this way. You may have to tweak it a little to get the deals to work for you. Other purchases via these sites were:

- 70-200 IS f2.8L - $978  (shipped)

- Sigma DG 35 1.4 - $550 (Shipped)


To be Continued.....


Wednesday, November 25, 2015

Welcome!!!!!

If you are reading this blog you are just as interested in photography as me, if not more (if that's possible). Creating this blog is going to be my way of tracking my progress, as well as my accountability partner. I also want to use this blog to help grease the wheels of those who are interested in photography, but haven't found that "push" to go out and get it done.  So, lets get started....


About me:

I am a college graduate who is currently making a switch in careers. I used to be a teacher but now my main focus is becoming a dentist!  Where does photography fit in? Photography and dentistry are very closely related in my opinion. Being able to understand lighting, angles, shades, proportions, and attention to detail are essential in both fields. I can use these concepts when creating a tooth or capturing a memory. Last but not least, I want to use photography as a source of income (to pay for classes, application fees, travel, student loans) as I switch careers.

The Decision:

I decided to seriously pursue photography after my sister got married in 2014. Though I was a groomsman in her wedding, I brought along my T2i (with the kit lens)and snapped as many pictures as I could throughout the event. I ending up talking with her wedding photographer, Teshorn Jackson and he was just an amazing resource and guide. He gave me crash courses on iso, aperture, and shutter speed, told me about his equipment, and even let me use his trigger and strobe setup to snap a family shot. (<- that was a long sentence). So I made a plan to pursue photography full time. 

Where I am now....

So, as I write this blog my under standing of aperture, iso, and shutter speed is better that when I started. However, there is still this great big mountain of photography that I still need to explore. To this day I currently have only had 1 paid gigs, one city walk, and 100s of at home shoots staring my wife and daughter since I started in 2014. Know that you are getting the real deal when I say, I AM AN AMATEUR.  

What you must know....

My goal is to clarify and provide information that makes learning the art of photography easier. There are going to be better resources for explaining certain topics than I can. Remember this is my personal journey. Feel free to use my understanding and experience to become BETTER than me as a photographer.  Take the information that helps you understand the best, and throw everything else out of the window. 

You know your learning style the best. Take that learning style, and make photography work for you. Once you learn it, teach it.  I am a strong believer that if you can't teach it to a kid, you don't know it well enough. 

I am not here to bash on anyone! Period! We are in a world where differences exists, and I accept that. What I like and what you like may differ greatly. However, those differences makes us who we are. 

Currently, I don't know what photographic genre I am aiming for. However, the principles of photography should stay true as I shoot, develop, and grow. I will eventually narrow down my choice and focus on 1-2 specific genres. My gear and journals will then cater to that style of shooting. For other genres I will definitely get you the right resources. 


My gear....

Let it be known that all my gear is Canon. Why? Because, Canon is what I started on. It is what I have known, and that's the only reason. You can take remarkable picture no matter what brand you use.  You just have to learn the fundamentals.  Here it is:

Canon 5D Mark III 
Canon 70-200 f2.8L
Canon 85 f1.8 
Canon 50 f1.8
Sigma 35 f1.4
YN (yongnuo) 600ex
Canon 430ex II
YN trigger system
3 Umbrellas, 2 stands, and 1 reflector